Intermediate Digital Design
Intermediate Digital Design is the second course within the Digital Design Pathway where students will focus on developing advanced skills to plan, design, and create interactive projects using the elements of text, graphics, animation, sound, video, digital imaging, in interactive projects. These skills can prepare students for entry-level positions and other occupational or educational goals.
Website Portfolio
|
Students will be introduced to website layout and design. They will apply this knowledge to the design of their own website they will use as a portfolio for this course. The website will be designed on weebly.com. One of the main ideas we will focus on is hierarchy in your material.
Click here to view RUBRIC |
|
Nebraska State Standards for Intermediate Digital Design (IDD)
IDD 2.6 - Plan, create, edit, and publish a multiple page website.
IDD 2.6.1 - Create a website planning document including hierarchy, navigation, colors, planned links, and images.
IDD 2.6.2 - Build a website of multiple pages that includes digital media.
IDD 2.6.3 - Prepare and publish website for appropriate delivery.
Website Biography Cutout
|
In this project you will use Photoshop to create a cutout similar to the one below. This image should include one large image of yourself, as well as at least 5 other small cutouts that interact with the larger one (Your Focal Point). Focus on where the figures are facing to make the viewers eye travel around the canvas.
This should also have a theme that goes with your interests or hobbies you like to do. Be creative and make your work tell a story. 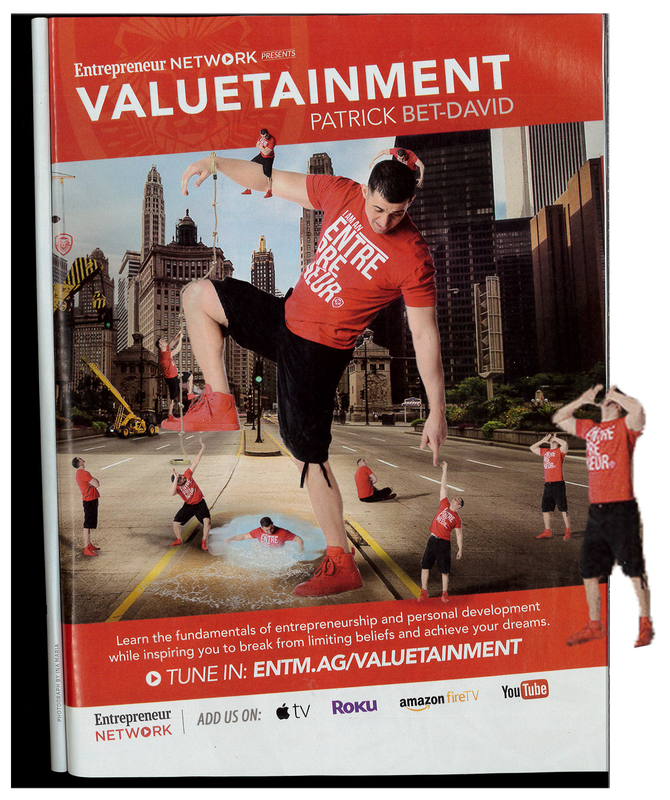
|
Another requirement is that you have at least one of the smaller figures running off the image. To achieve this you will need to size down your background to allow for transparent space in your Photoshop document. Keep in mind this transparent space will also be part of the photo, so no text on your website will be able to take up this transparent space. So keep it to a minimum if needed, or use it to your advantage. When you are done making this image you will save it as a .png. This file format supports transparency and is small in size. This makes it great for using on your website.
Click here to view RUBRIC |
Nebraska State Standards for Intermediate Digital Design (IDD)
IDD.1 – Students will integrate visual arts techniques as well as elements and principles of design to develop digital media.
IDD.1.1.1 – Utilize the design process to create digital media (e.g., focal point, directional flow, white and negative space)
IDD.2.2 – Create manipulate, and appropriately use raster graphics.
IDD.2.2.1 – Identify graphic formats and their appropriate use (e.g., jpg,gif, tif, bmp, psd, png, pdf)
IDD.2.2.2 – Acquire image assets (e.g., digital camera, internet search, stock sources, scanning.)
IDD.2.3.1 – Understand that focal point is the visual element in a page that the viewer notices first.
Career Opportunity Webpage
|
In this project you will research and put together a webpage on your portfolio site about at least 5 different career opportunities available in Digital Media. Things to include would be the job title, description, current wages, and what postsecondary education you would need for this position. You will also include 5 schools that offer education in these areas. Things you will need to focus on for this webpage are hierarchy of your information and layout of the page. Be sure the most important information stands out and is noticed first. Be sure the items on your page line up and fit with your overall theme.
Click here to vie RUBRIC |

|
Nebraska State Standards for Intermediate Digital Design (IDD)
IDD.2.2.2 – Acquire image assets (e.g., digital camera, internet search, stock sources, scanning.)
IDD 4 - Students will develop an awareness of digital media career opportunities.
IDD 4.1 - Compare and contrast occupations related to digital design.
IDD 4.1.1 - Research postsecondary education opportunities.
Art Movements Webpage
|
You will create a webpage that is dedicated to a historical art movement. This should include a description of the art movement. Famous works of art with information about the artist. You will also create your own modern piece that fits the styling of the art movement you choose. Some video tutorials to the right are examples of images made that could fit under the different art movements including Surrealism and Cubism. Any images you use in your own piece need to be completely original images. This means they need to be done using photographs you have taken.
A list of art movements can be found by clicking here. Click Here to view RUBRIC |
|
|
|
Nebraska State Standards for Intermediate Digital Design (IDD)
IDD.2.2.2 – Acquire image assets (e.g., digital camera, internet search, stock sources, scanning.)
IDD 2.6.2 – Build a website of multiple pages that includes digital media.
IDD 3 – Students will exhibit ethical conduct related to computer use.
IDD 3.1.1 – Create a project utilizing original content, public domain, or licensed media.
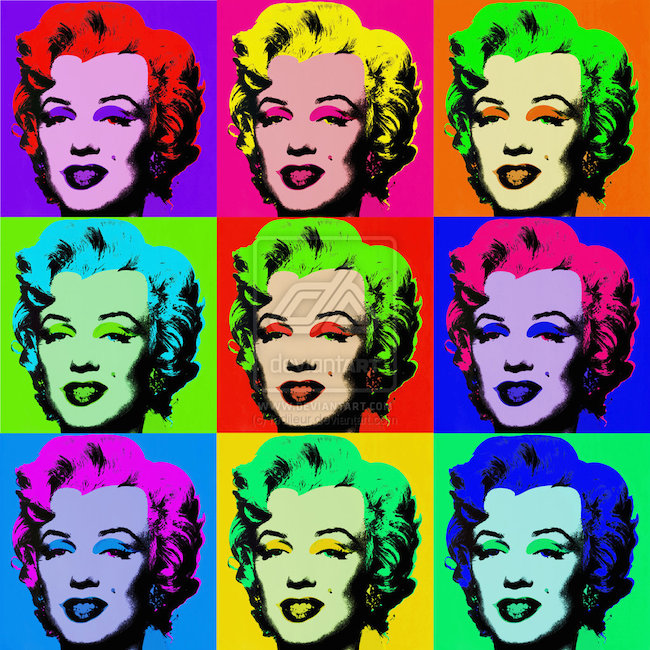
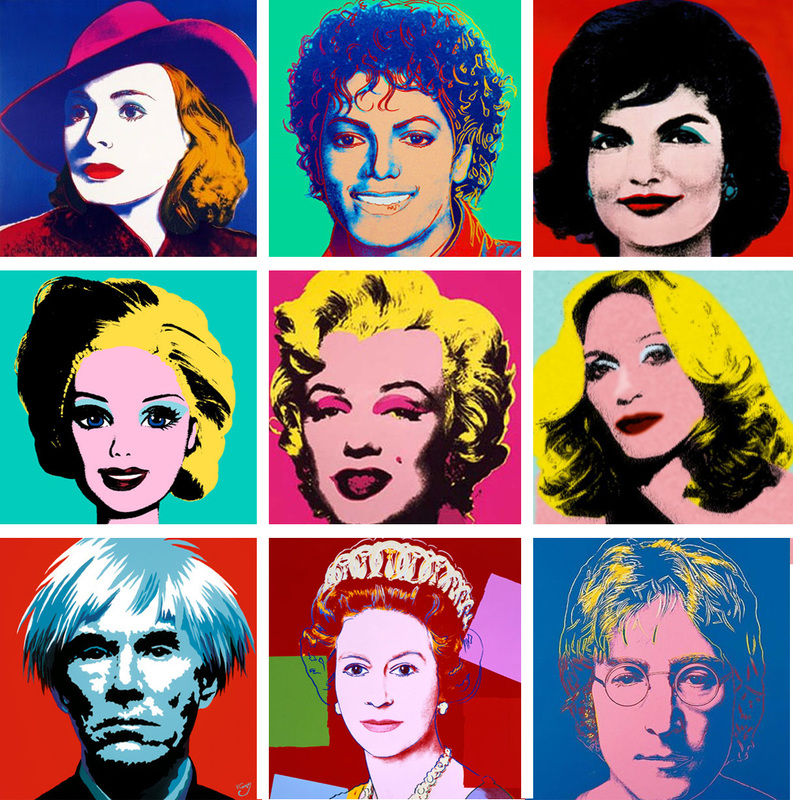
Personal Pop Art
|
To begin this lesson watch the video to the right so you have an idea of what Pop Art is.
Popular, witty, sexy, glamorous – pop art exploded onto the cultural scene in the early 1960s. A new generation of artists rebelled against ‘high art’ to embrace the world of advertising, television, film stars, pop music and consumerism. Pop art shocked many but inspired even more. |
|
|
You will use Photoshop to create a Pop-Art poster using portraits of yourself. You will use the camera provided in class to take these in front of a white background. This will make it easier to do the cutout of the image. You will take 9 images of different poses and facial expressions. You will do a 3-picture by 3-picture layout of your choice. Images can be placed next to each other or spaced using a color of your choice (black or white). These will resemble the sample prints you see below. Each image should have different bright/vivid colors applied to it to give it the look from the era of pop art. The images should also have a consistency that looks as though the same type of effect was applied to each. You will also need to add a callout shape with text that goes along with the expression in the photo.
Click here to view the RUBRIC Examples
|
|
Stop Motion Animation
|
You will take still frame photos and place them into adobe premiere pro. When the photos play it will create frame by frame animation of your images.
|
|
Animation
|
For this animation you will start out doing some rough storyboarding to get an basic storyline. You will use this story line to build a character profile and design a character using a design process similar to the one in the video to the right.
|
|
Media Club Commercial
Example |
|
Ornate Design
|
Using Illustrator you will create an assortment of custom brushes. Once you have your brushes created the video will walk you through a way to set up your canvas to automatically reflect whatever you create on the right half over to the left half. This will allow you to see the symmetry being created in real time. Keep in mind these brushes will take some practice to get used to the style of stroke you can make. Work from your larger details down to the smaller more precise details.
Click here to view RUBRIC Student Example
|
|
Nebraska State Standards for Intermediate Digital Design (IDD)
IDD 2.1 – Create, manipulate, and appropriately use vector graphics.
IDD 2.1.2 – Utilize Drawing tools to create and manipulate paths (e.g., anchor points, directional handles) in the creation of a project (e.g., personal, business, movie logo).
IDD 2.1 – Create, manipulate, and appropriately use vector graphics.
IDD 2.1.2 – Utilize Drawing tools to create and manipulate paths (e.g., anchor points, directional handles) in the creation of a project (e.g., personal, business, movie logo).
Dollar Bill
|
In this assignment you will apply many of the techniques you learned in the ornate design assignment exploring how to make brushes and working with vectors. You will create a paper currency with your name on it. You will also create all the detailing and background patterns in the design of the dollar bill.
Student Example
|
|
|
You can also watch the video to the right to see another method of getting your image to look like it is printed on paper currency. This will also show you how to apply a texture to your image.
|
|
Nebraska State Standards for Intermediate Digital Design (IDD)
IDD 2.1 – Create, manipulate, and appropriately use vector graphics.
IDD 2.1.2 – Utilize Drawing tools to create and manipulate paths (e.g., anchor points, directional handles) in the creation of a project (e.g., personal, business, movie logo).
IDD 2.1 – Create, manipulate, and appropriately use vector graphics.
IDD 2.1.2 – Utilize Drawing tools to create and manipulate paths (e.g., anchor points, directional handles) in the creation of a project (e.g., personal, business, movie logo).
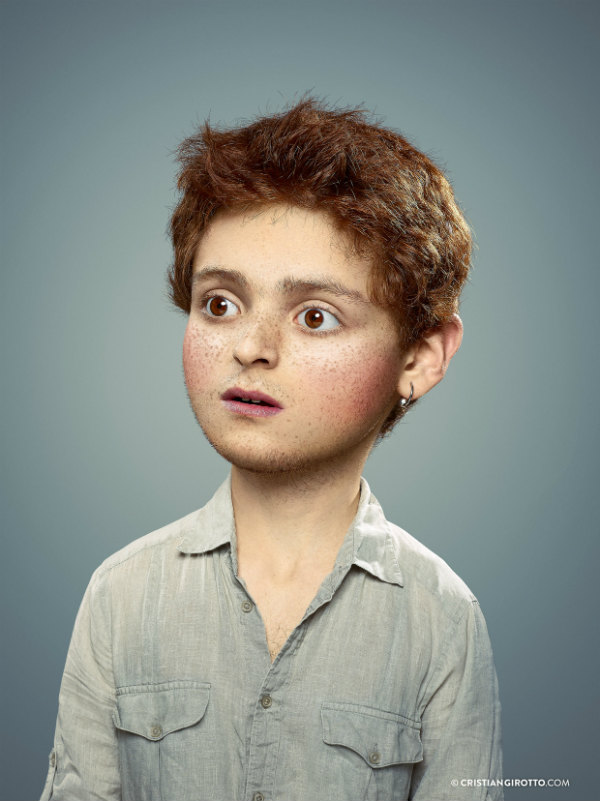
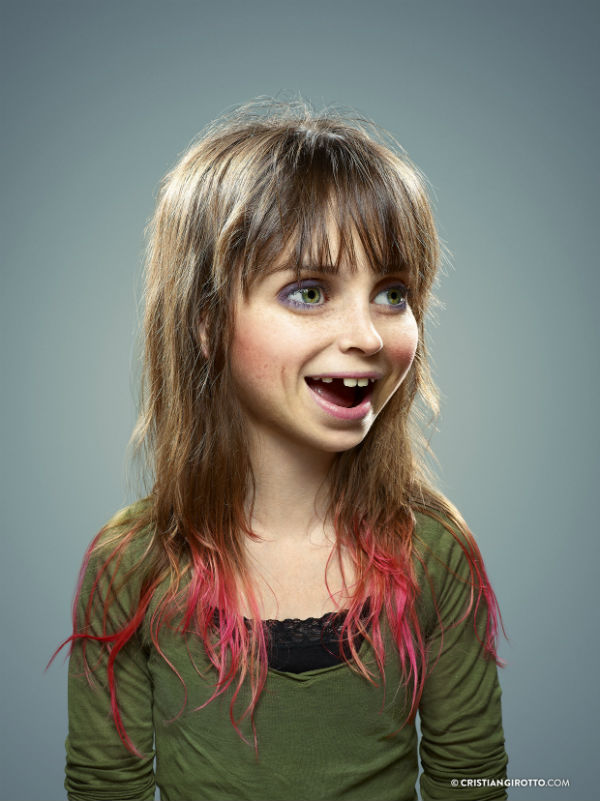
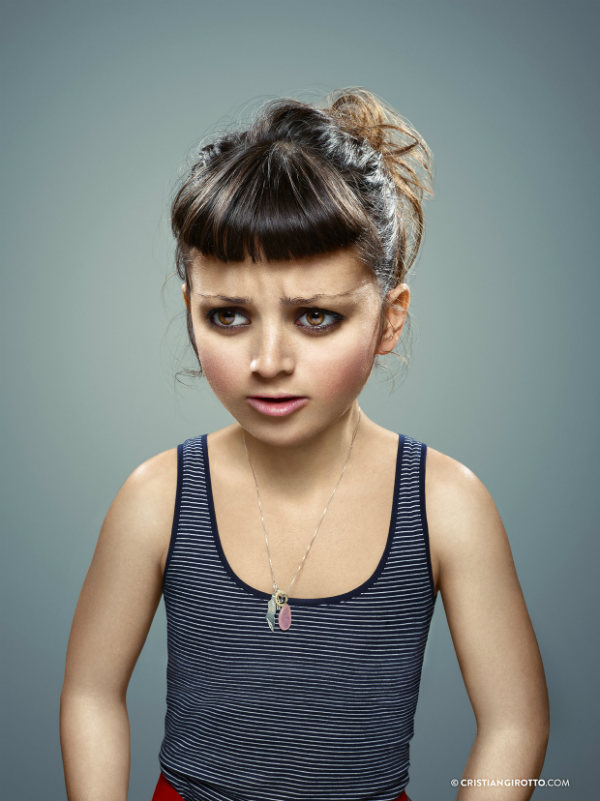
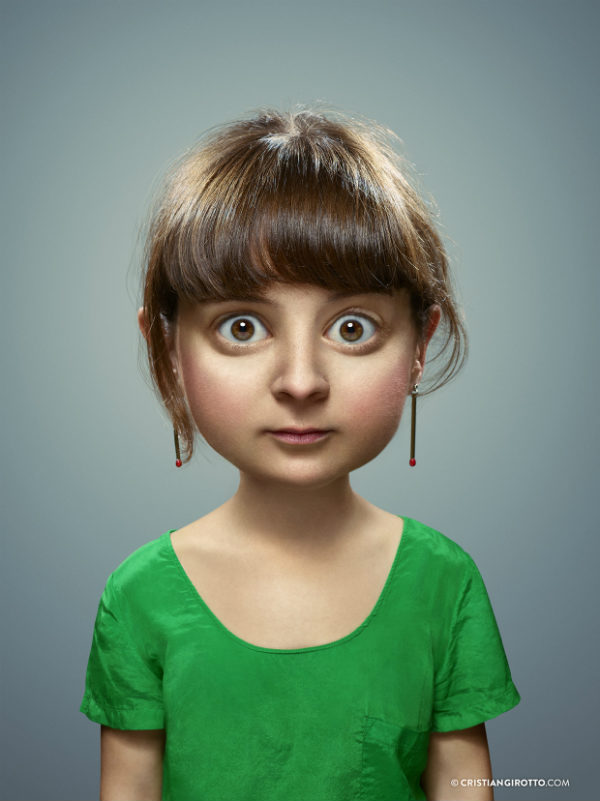
The Outer Child
|
Students will use a school-style portrait of themselves to create a photo that appears as an older person with a younger persons features. This will work best if you can find a photo of yourself from kindergarten or first grade. We will then reproduce this image with how you look today. You will then use techniques similar to those you have incorporated when doing a caricature to modify the proportions to have the same look as the younger photo.
Click here to view RUBRIC Examples |
|


Video Effects
|
Students will create a short film clip of their choice. They must use 3 of the 6 video effects found at the bottom of this lesson.
|
|
|
|
|
|
|
|
|
|
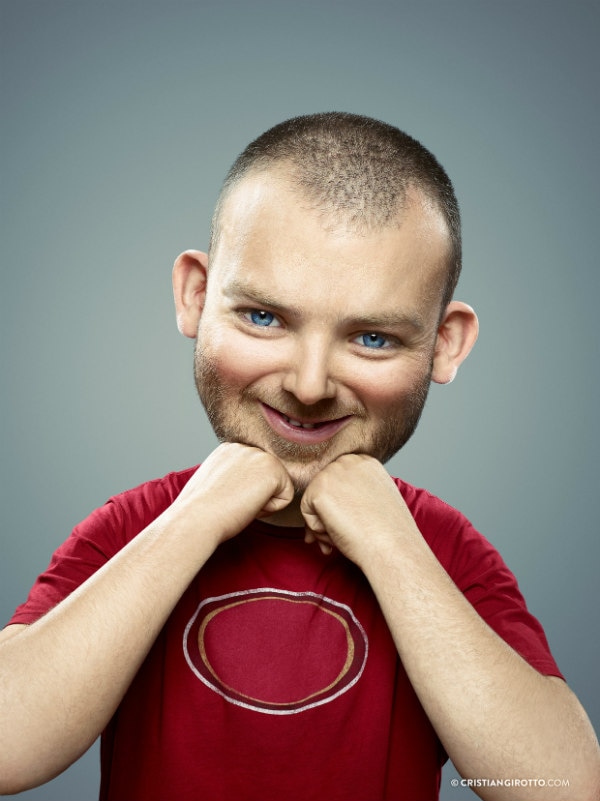
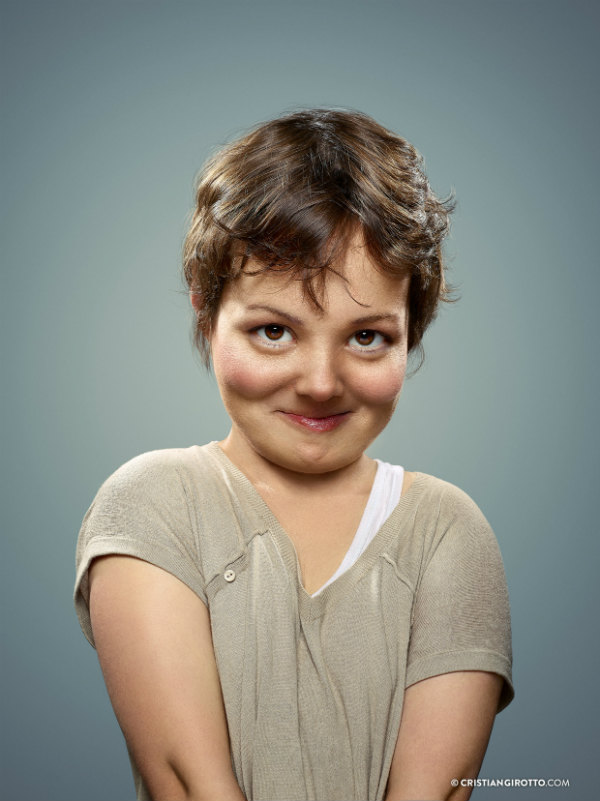
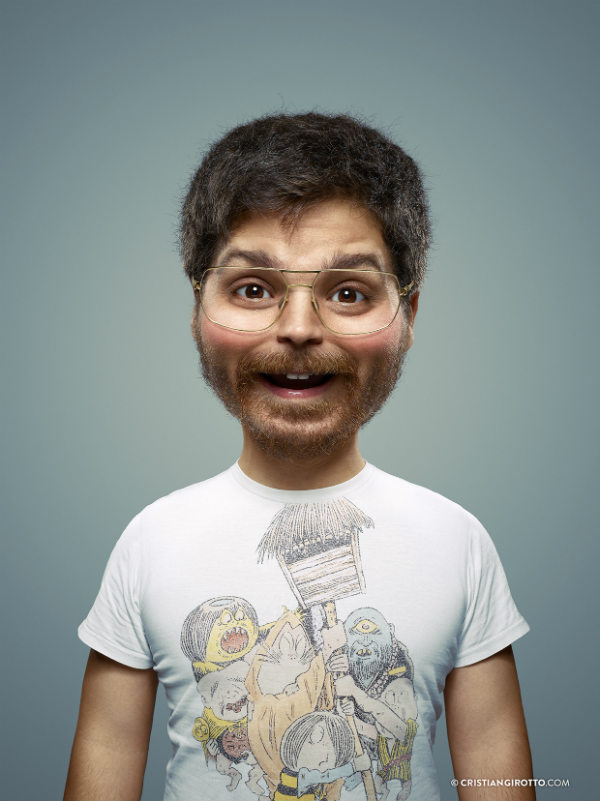
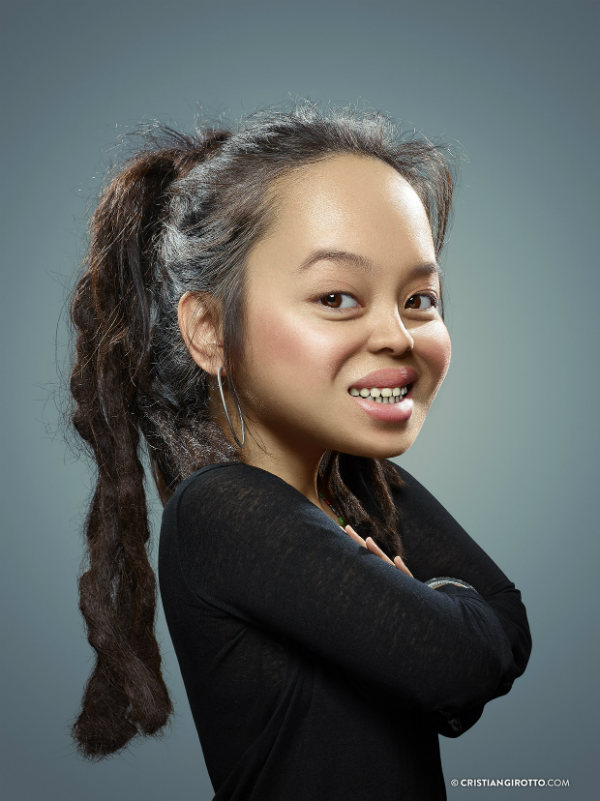
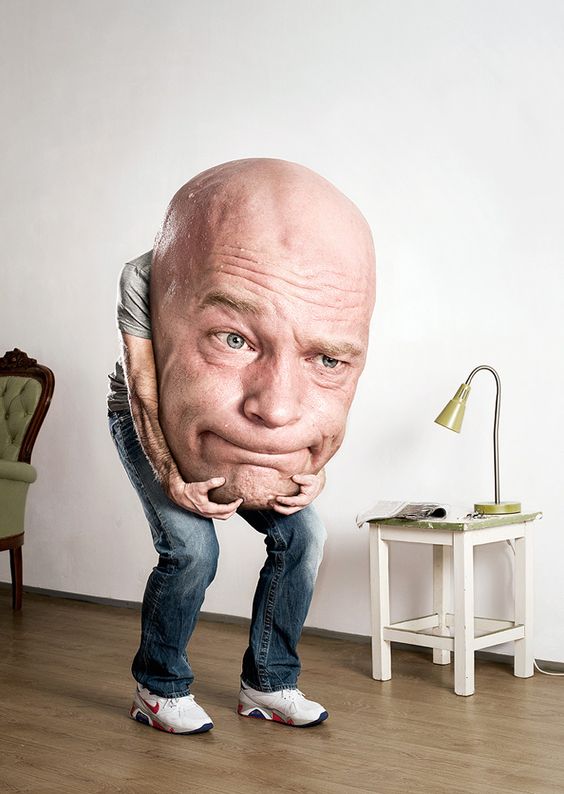
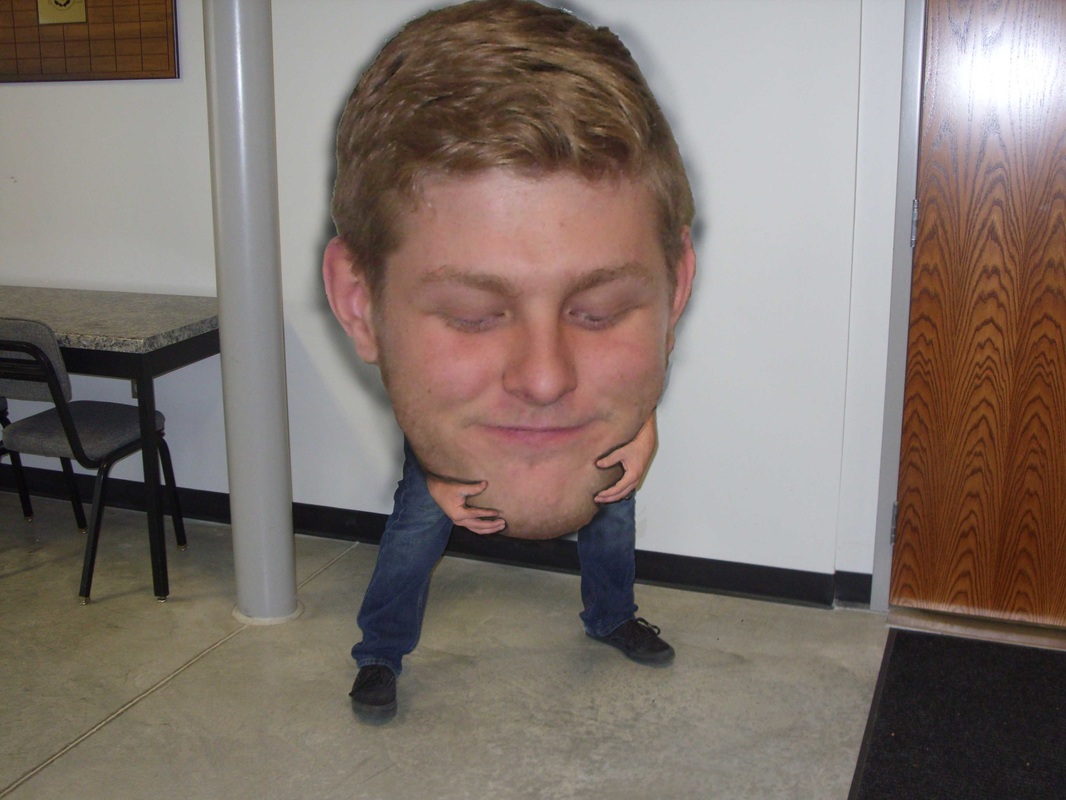
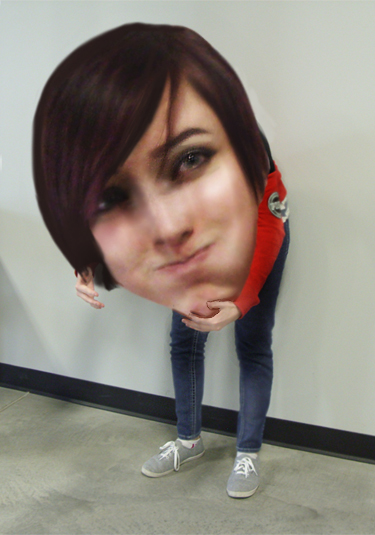
Big Head
|
You will take two photographs. One with the pose that you are holding a very large object in front of you. The other to get the facial expression you desire. Typically a look of surprise or distress is the most effective. You will then give the effect as though you are holding your own enlarged head. You may have to do some corrections in terms of color, shading, or adjust the focus to get the images to fit together effectively.
Examples
|
|
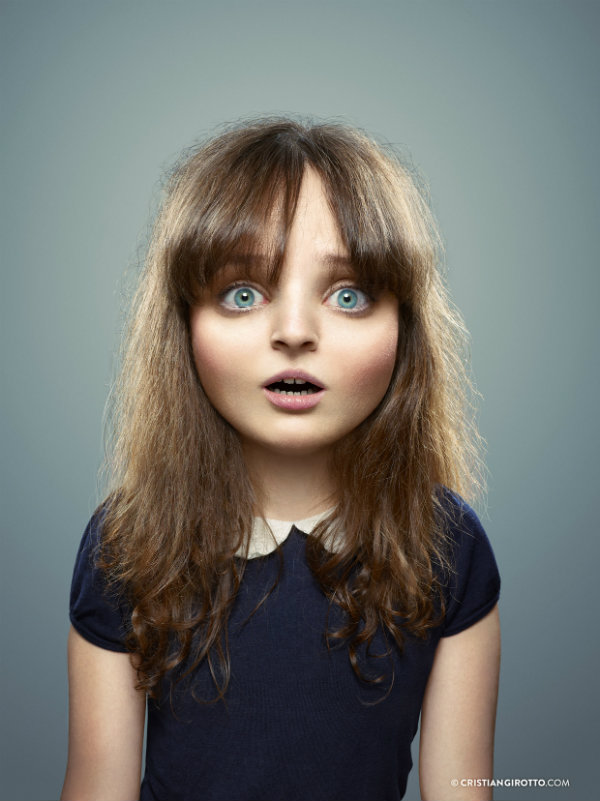
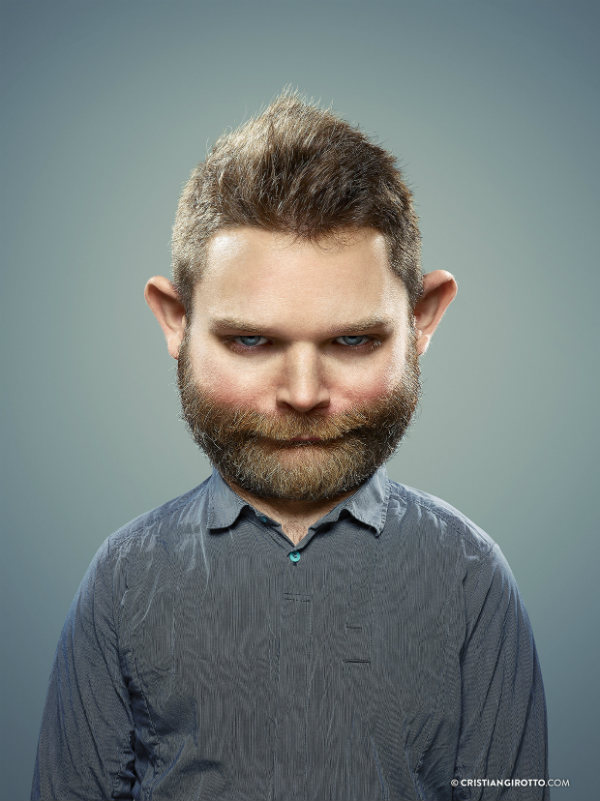
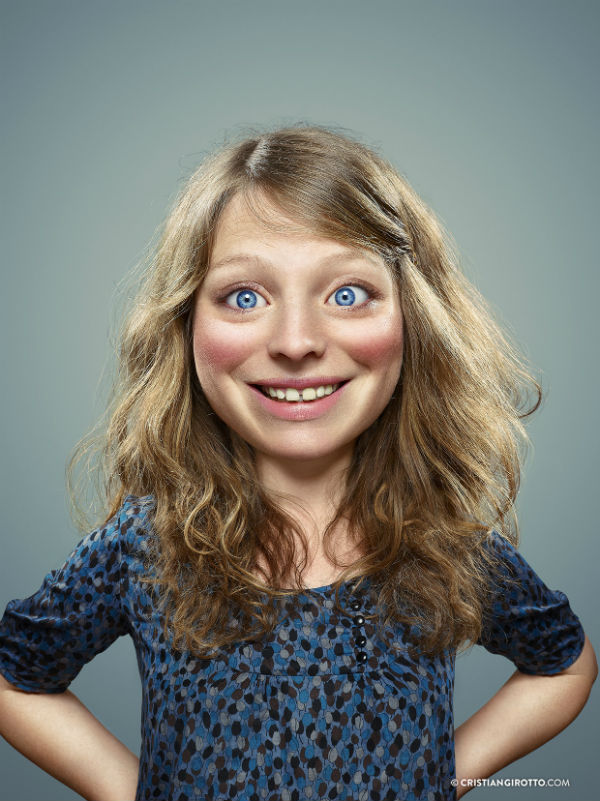
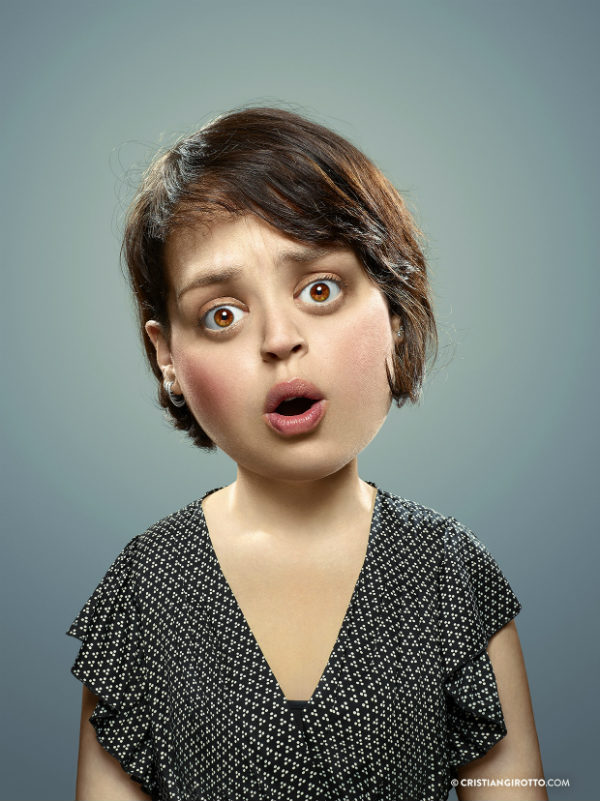
Fibonacci Mask
|
Using a straight on portrait you will adjust the features to fit the mask that has been created based off the Golden Ratio. This ratio is obtained from the Fibonacci number sequence. It will proportion the face according to that Golden Ratio. Once you get the features repositioned you will need to choose two of the three tutorials below and apply these effects to your portrait as well.
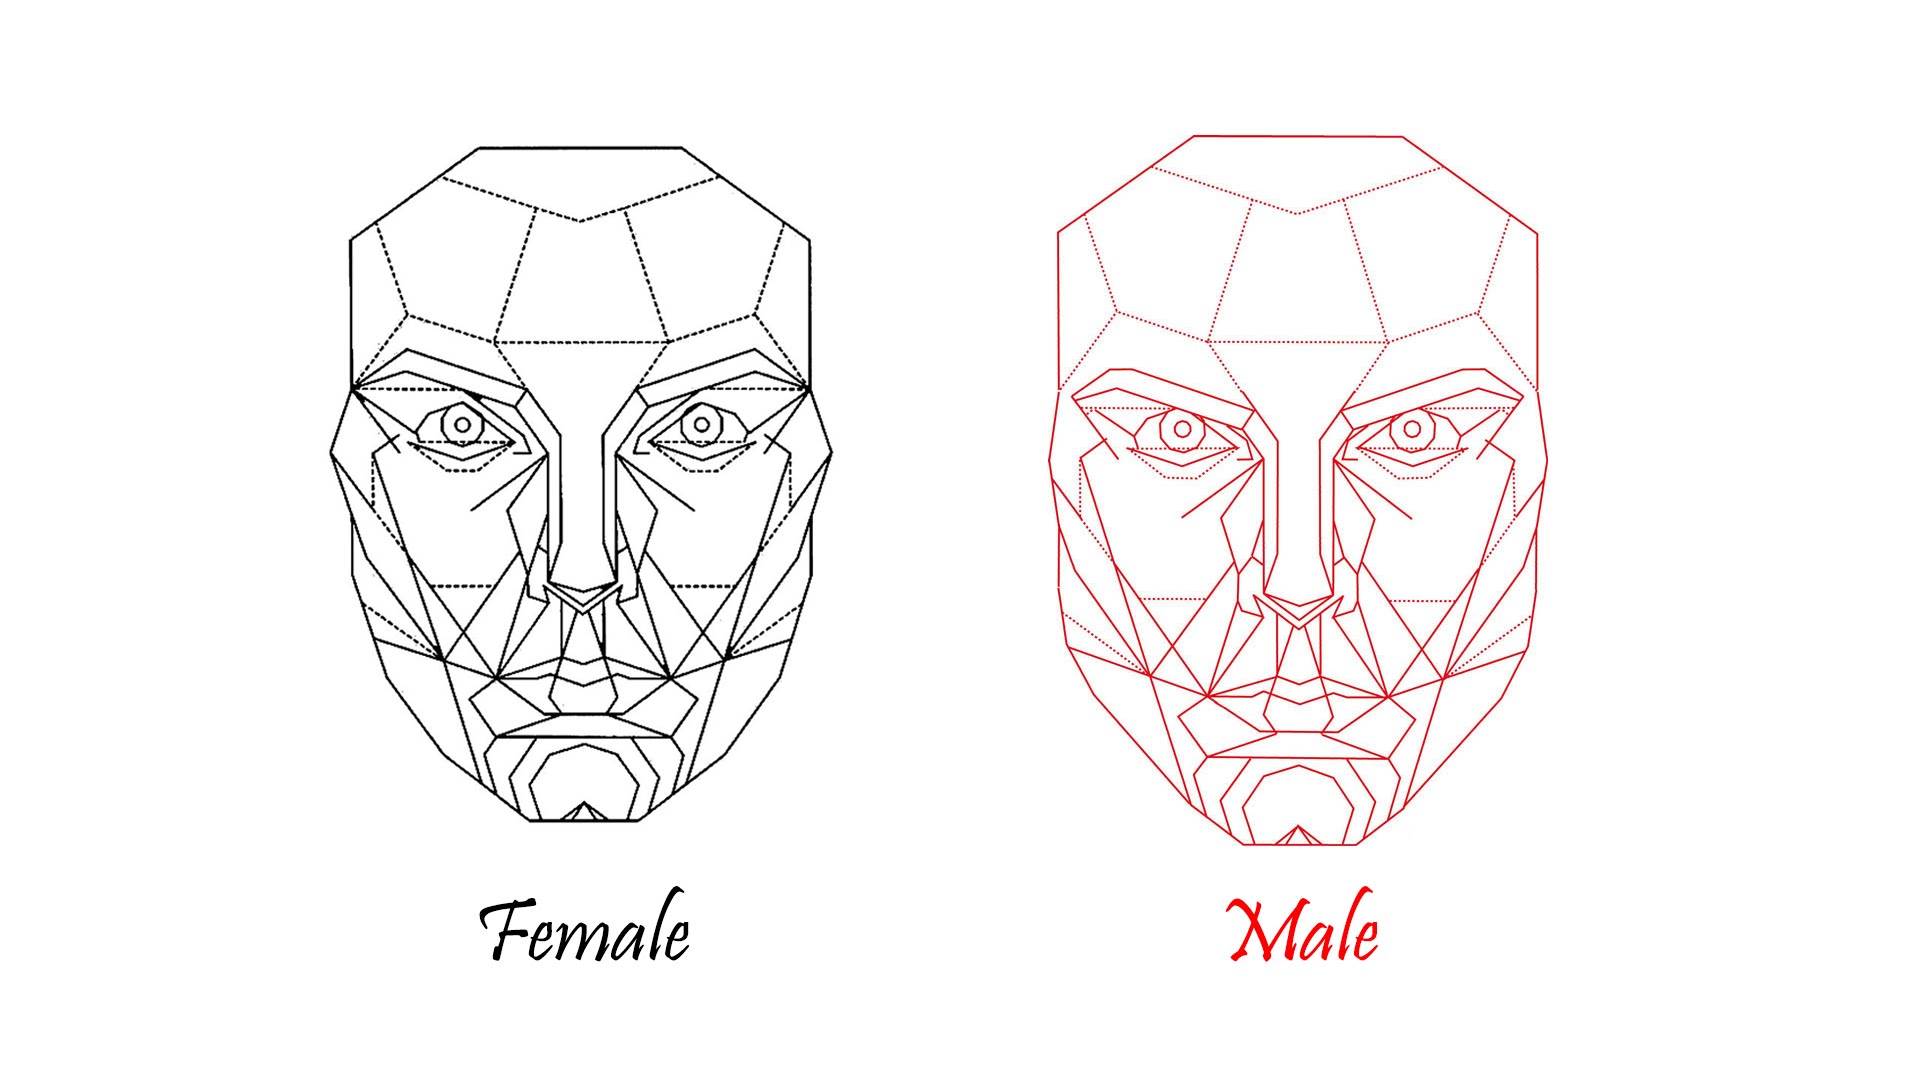
^ Download this Fibonacci Template. ^
|
|
The tutorials Below will show how to add additional effects including Airbrushed Skin, Color/Brighten/Sharpen eyes, and how to make colors Pop using Photoshop. You need to apply at least two of these to your final image.
|
|
|
|
