Intro to Digital Design
Unit 1: The Design Process
Project 1 - Illustration 1 (Vinyl Cutout)
|
You will use Illustrator to make a vector image that will be cut out in vinyl. Keep in mind this will be a one color cutout so the color of your image doesn't necessarily matter. You will be shown in the video how to downlaod objects and convert rasterized images into vector shapes. Keep in mind you will also need to include some sort of customization as well as an element of text. Once you have completed this assigment you will save it as a .svg. You can then email me the .svg with instructions as far as color and size.
Student Examples
|
|


Project 2: Illustration 2
|
You will use Illustrator to make your first illustration. This will be a hand drawn sketch that is uploaded to illustrator. The sketch may be done on paper or in Photoshop. Once you have the sketch uploaded, use the pressure setting on your Wacom pen and ad outlines over the top of your sketch. This needs to have a good use of thin to thick line. You will also add shadows and highlights using tints and shades of your base color. Be sure to watch the tutorial video to the right for a quick introduction to the project. Then view the Space Chimp tutorial below here to see how you will accomplish this project. Remember your final image needs to also include your original sketch in one of the bottom corners for reference.
Click here to view the project RUBRIC Student Examples
|
The six videos below are excellent examples of digital illustration that all use similar methods to this project. The tutorial I would like you to model your project after would be the one of the Space Chimp. This does the best job of walking you through the tools you need to use as well as how you should manage your layers to have the outline on the top layer, the color on the back layer, and the shadows and highlights on the middle layers.
|
|
|
|
|
|
|
|
|
Project 3 - Vector Self Portrait
|
Using a photo of yourself for an outline, you will use illustrator to make a self-portrait in vector format.
Click here to view the project RUBRIC. Student Examples
|
|


Project 4: Cutouts
|
You will use Photoshop and the Wacom Tablet to make a cutout from an image of your choice. Be sure the image is of good resolution. Once the cutout is done you will download a background to match it and place it in the image.
Click here to view the project RUBRIC Student Examples
|
|


Project 5: Color Theory
|
You will use Photoshop to develop 3 separate images. All three of these images need to be placed together in a final composition to be turned in. This composition Should have a neutral colored border with labels for each image.
Click here to view the project RUBRIC Student Examples
|
|


Project 6: Photo Collage
|
Using Photoshop you will combine at least 4 photos. Tools you will learn to use include Layers, Layer Styles, Blending Modes, Layer Opacity and Masking. The completed project should appear as one image, not four separate images placed together. All images must fit together to produce an overall theme.
Click here to view the project RUBRIC Student Examples
|
|


Project 7: Photo To Drawing
|
You will choose a photo with good resolution from the Internet to do a photo to drawing effect. Architectural images would work the best. You will follow the step-by-step directions from the video tutorial available online to achieve the photo to drawing effect. The overall composition will be put into a black matted layout with a thumbnail of the original image included to the side.
Click here to view the project RUBRIC Student Examples
|
|


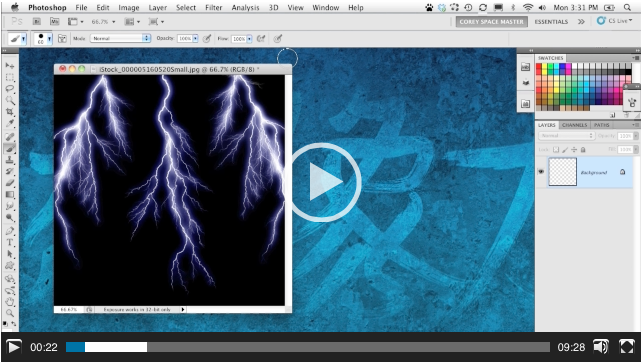
Project 8: Lighting Brush Effect
|
You will watch the video to the right. This will walk you through how to set up a custom lightning brush. You will need to make sure you choose a picture of lightning that is of good resolution. Once you have this brush made you need to apply it to some type of image. This could be used behind a cutout or on top of another image. Be sure the image you use for your final product is also of good resolution and doesn’t appear pixelated.
Click here to view the project RUBRIC Student Examples
|
|


Project 9: Fire Brush Effect
|
You will watch the video to the right. This will walk you through how to do a fire brush effect to a photograph. You may use masking to get this effect to appear on parts of the photo, or the entire photo. Once your project is complete be sure to place a black frame around the outside. You also need to include the original photo in one of the corners for reference.
Click here to view the project RUBRIC Student Examples
|
|


Project 10: Building A Composite
|
This video is not step-by-step for how you need to do your project. But it will show you essential tools used in making your composite photo. You will need to find two photographs that you can make a composite out of. These photos will be cut out and placed on a gradient background. The two photos need to fit together to achieve an overall theme. You will also need to include the two original photos to in the final composition with the same drop shadow effect applied to both.
Click here to view the project RUBRIC Student Examples
|
|


Project 11: Antique Photo Effect
|
This video is not step-by-step for how you need to do your project. But it will show you essential tools used in making your antique photo. Students will use a portrait and create an antique looking photo effect in Photoshop. Your focus in layout will be with the rule of 3rds. You will also need to find and cutout an antique looking picture frame to place the photo in. The background needs to have a wallpaper pattern applied to it.
Click here to view the video for Rule of Thirds. Click here to view the project RUBRIC Student Examples
|
|


Project 12: Terminator Poster
|
You will watch the video to the right. This video is step-by-step for how you need to do your project. When the project is complete you should have something that looks like a poster for a Terminator movie. Have some fun and add a movie title using text.
Click here to view the project RUBRIC Student Examples
|
|


Project 13: Smoke Portrait Effect
|
You will watch the video to the top right. This video is step-by-step for how you need to do your project. Upon completion you will have a portrait that portrays a smoke effect.
Final composition needs to focus on the Rule of Thirds and cropping for compositional interest. See video to the bottom right for more on rule of thirds. You will export 2 photos for the smoke effect. One will show a black and white image of the smoke effect. The other will show a colored smoke effect. The final product should have a mat style frame with three images; the original photo without smoke, the black and white smoke, and the colored smoke. To get your Black frame to shoe over the black background you will need to add a white outer glow to it. You can see this in the middle student example below. Be sure the mat style frame has a title across the top, and include a description of the project across the bottom of the frame. Click here to view the project RUBRIC Student Examples
|
|


DESIGN PROCESS - MOOD BOARDING
Project 14: Photoshop Alpha Channels
|
You will use Alpha Channels in Photoshop to select certain parts of a photograph. Copy and flip your selections to give it symmetry. You will also need to add a border using alpha channels as well. This project may end up resembling something similar to a Rorschach image. Finally Choose at least 3 colors that work well together. Black or White may be used as one of your colors.
Click here to view the project RUBRIC Student Examples
|
|


Project 15: Caricature 1
|
In this project you will open a photograph in Photoshop. You will piece apart the photograph and use the liquify tool to distort the features of the individual. The separate pieces will need to be blended back together. Finish by flattening the image, then using the dodge and burn tools to add shadows and highlights to make the image appear more like a cartoon. Don’t forget to use the blur and sharpen tools as needed to enhance parts of the image.
Click here to view the project RUBRIC Student Examples
|
|


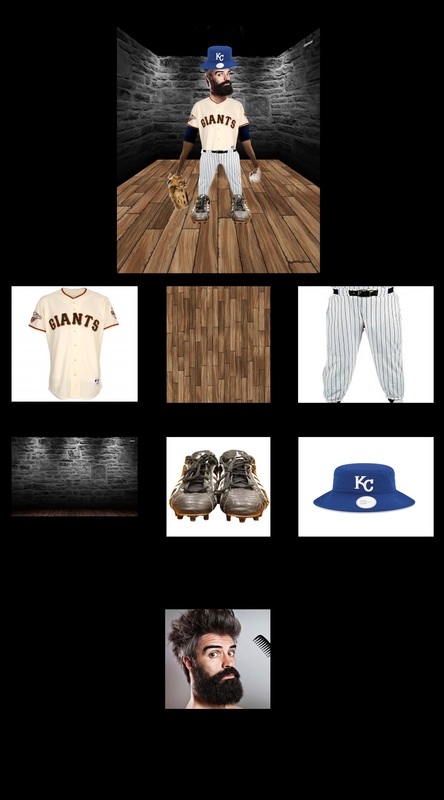
Project 16: Caricature 2
|
This project will be done in Photoshop. You will produce a full body Caricature with a perspective background. You will be required to have 6 different pieces for the character (these need to be from different images), and 3 texture images for the background. You will also have 3 extras applied as identified in the tutorial video. You will turn in two separate files for the project. One image needs to have each of the original picture files used in the project with the final project included (Project 13 – Images). The other image will be only the Finished Project.( Project 13 – Caricature 2)
Click here to view the project RUBRIC Student Examples
|
|


Project 17 - Letter Portrait
|
You will be making two letter portraits. One will be using individual text characters to outline features. The other will be using words associated with the person in the portrait (Project 18 Below). These will be done in Illustrator. The Image needs to be loaded into the bottom layer with the opacity reduced while working. Then should be turned off so only the text remains once completed. Each portrait should be submitted separately as a PDF.
Click Here to View RUBRIC. Students Examples
|
|


Project 18 - Word Portrait
|
For this project you will want to use Photoshop. Just like in project 17 - letter portrait you will choose a portrait of a famous person. This will be easier to work with if you convert the picture to black and white to make it easier to see the shadows/highlights. You will use words that have been adjusted to fit the image using the Warp tool. The tutorial to the right will show you how to use this tool. It will also show a student example and some ways to finish your project.
Click Here to View RUBRIC. Student Examples |
|


Project 19 - Illustration 3
|
You will use the pen tool in illustrator to create 3 detailed outline drawings of your choice. You can either do one object from 3 different views (top, front, side, 3/4, etc.). Or you can choose 3 different objects that somehow relate to each other. In the past some people have chosen to do 3 different pieces of architecture. The 3 images will be combined together to create a poster that advertises the items you have placed together. This is the reason each picture must be of the same item, or items that are related somehow. See the student examples below.
Click Here to View RUBRIC. Student Examples
|
|


Project 20 - Book Cover
|
Choose a book from the library and redesign the cover of the book. You need to include a cover, spine, and back. The cover needs to include images. Images can be edited in Photoshop, but the project will be produced in Illustrator. Use illustrator guides to set up the size of the cover. The cover needs a ½ inch bleed and a synopsis. Synopsis is the name given to the brief summary written on the back of a book. It contains a brief description of the characters (if any), the themes in general short terms and is more often than not in the present tense.
Click Here to View RUBRIC Student Examples |
|


Project 21 - Trifold Brochure
|
Design a Trifold Brochure for either a company you can research or Central Valley High School. Images will be edited using Photoshop or illustrator. Final project will be executed in Illustrator. These will be printed off and folded to check on layout and measurement. Be sure you read through the handout to find the information that should be included on each panel of your trifold brochure.
Click Here to View HANDOUT Click Here to View RUBRIC Examples |
|


Projects 22, 23, 24 - Brand Identity
|
Students will develop brand Identity materials for a company.
One Required material will be a business Logo. Students will develop a booklet that incudes the following: 1. Logo Specifics 2. Typeface Details / Typography in Use 3. Color Specifications 4. Logo Styles (lock-ups) 5. Logo Best Practices Students will also need to develop 3 additional Items of their choice to assist in the Brand/ Identity. These could include any of the following: stationery, marketing collateral, packaging, signage, messaging, and digital projects, among others. Your following two assignments will be a business card for this company as well as a tri fold brochure for this company. So make sure you don’t choose either of these for your 3 additional items in your brand Identity. Click here to view HANDOUT Click here to view RUBRIC Examples |
|
Project 25 - Flash Animation (Sad Potato)
In this project you will get an introduction to Flash Animation. The tutorials that follow are done in Adobe Flash which is now named Adobe Animate. These programs still have a lot of similarities. You will have six parts to work through in this lesson. By the end you should create the same animation done in the tutorial videos.
Part 1 - Set the Stage for your animation In this first video, we get acquainted with the FLA document type and prepare our stage surface for the lessons to follow by setting the project width, height, background color, and FPS.
|
|
Part 2 - Create the scene for our character. Create the background and foreground for our animated project using the built-in drawing and image import tools. Import a photograph of the sky, create some grass, and draw a cloud using the Oval Primitive tool. Click Here to download the background file.
|
|
Part 3 - Let’s Draw Sad Potato. In this lesson, we’ll use symbols and the project library as we create the character. We’ll see how to draw out the character’s body, legs, and face and work with these elements across Timeline layers.
|
|
Part 4 - Animate the character. This lesson shows how to create a looping animated sequence that makes out character walk. In doing so, we’ll see how to modify our Graphic symbol and use Frames and Motion Tweens to create the animation.
|
|
Part 5 - Fine-tune the character’s movement This lesson ties it all together by animating elements of our scene across time and controlling our character’s movement from one side of the stage to the other while animating other properties such as size and position along a Motion Path.
|
|
Part 6 - Export the project for the web, iPad, and more. In this final lesson, we demonstrate how to publish our project for Flash Player, HTML Canvas, and as a self-contained video for distribution across virtually any device.
|
|
Project 26 - Stick Figure Animation
|
For this project you will create a short cartoon animation that touches on the following principles of animation. There are short videos that give a description of each principle of the website. Keep in mind there are 12 principles shown in the videos. You only need to incorporate the following 9 in your animation. This can be done using stick figures, objects, or a combination of both interacting in the scene.
Click Here to view RUBRIC |
Watch this video to learn about keyframe animation for your Adobe Flash Cartoon.
|
Video Tutorials for Letter Portrait
|
|
Below are sample videos for Choose Your Project
|
|
|
|
|
|
|
|
|
|
|
|
|
|
|
|
|
|
|
|
|
|
|
|
|
|
Project 18: Striking Match (watch This part First) then This Part
